When you’ve found the perfect fifth wheel camper for your adventures out on the open road, you will need a fifth wheel hitch to tow it safely. Fifth wheel hitches are designed to attach to the kingpin of the RV. The hitch’s metal frame connects to the bed of a vehicle enabling the fifth wheel camper pin to be securely fastened and hauled behind your vehicle smoothly and safely. It’s a very secure and strong connection due to its location in the truck’s bed rather than the rear. However, for this connection to be this secure, you will need to carefully follow directions for installing a 5th wheel hitch.
Installing the BXR2100 Fifth Wheel Hitch from Blue Ox
The Blue Ox 5th Wheel Hitch is rated up to 21,000 lbs gross towing weight and 5,000 lbs tongue weight. Below are general instructions for installing a 5th wheel hitch. Additional product warnings and maintenance notices for the BXR2100 Fifth Wheel Hitch from Blue Ox can be viewed on the website.
Prior to Installing a 5th Wheel Hitch
When completing the installation process, you want to be certain you are doing it safely. Ensure that installation is performed by someone who is aware of the risks and has knowledge of hazards and proper safety procedures involved with adding components to the chassis of a vehicle and the tools needed for installation. Make sure that the bed of the truck is clean of dirt and debris before starting installation. Additionally, do not alter this product in any way. Modifying this product could change the integrity and lead to a loss of connection between the trailer and the tow vehicle.
Hitch Base Initial Assembly/Installation Instructions
- Place the base of the hitch onto the gooseneck 2-5/16” hitch ball so that the arrow on each side of the base points towards the cab of the truck.
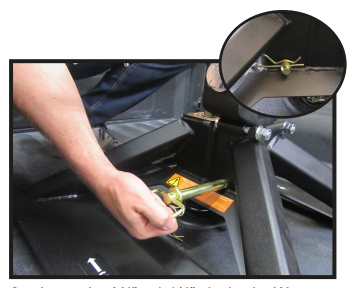
- Insert two (2) 1/2” x 3-3/8” pins into bottom holes in the hitch base and secure with lynch pins (inset).

- Using a 15/16” socket and torque wrench tighten the top bolt on the hitch base to 45 ft/lbs.
- Hand tighten the bolt on the cab side of the hitch base. Then using a 19MM 12 point socket and torque wrench, tighten the square head bolt to 100 ft/lbs.
- Hand tighten the jam nut on the cab side of the hitch base. Then using a 15/16” deep wall socket and torque wrench, tighten the jam nut to 120 ft/lbs.

Hitch Head Initial Installation Instructions
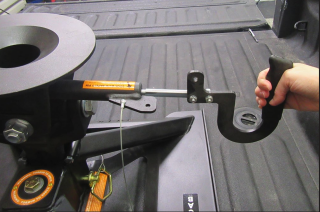
- Insert the center post of the hitch head into hitch base with the handle towards the driver side of the truck.
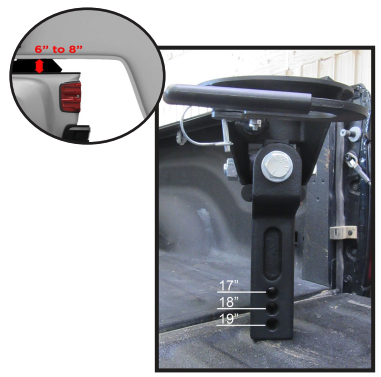
2a. Insert the 3/4” x 4-1/4” clevis pin. Wrap lanyard inside base arms and insert cotter pin (inset).
2b. Recommended clearance between truck bed and 5th wheel trailer is 6-8 inches (inset). Ensure the trailer is as level as possible, pin box adjustment may be required. To adjust the height of the hitch head remove the clevis pin and adjust appropriately.
- Removed loosely installed jam nuts. Tighten down the two (2) 11/16” flange nuts evenly then torque to 54 ft/lbs. Make sure that all slop has been removed from the center post.
- Install a 11/16” jam nut onto each bolt and tight both jam nuts evenly. Torque jam nuts to 54 ft/lbs.
Release Handle for Hook Up
- Remove locking pin from hitch handle.
- Pull handle outward.
- Turn handle clockwise till in the open position as shown. The handle will remain in this position until hook-up.

Note: Verify that the handle is in the locked position before reinstalling the locking pin.
- Once hitch is hooked up to the king pin of the trailer, turn the handle and reinstall the locking pin.
Attaching the Trailer
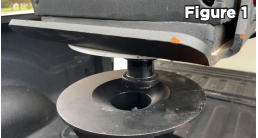
Place wheel chock on each side of the trailer wheels. Remove the safety pin from the coupler handle on the hitch head. Turn handle clockwise till in the open position as shown on page 9, step #3. Handle will remain in this position until hook-up. Adjust the height of the trailer so that the king pin is sightly above the top of the coupler. Confirm that lube plate is attached to the trailer’s king pin. Slowly back the truck towards the trailer, making sure that the king pin is center with the coupler. Once king pin is over the center or slightly rear of center and within the inner coupler circle, lower trailer until the king pin engages hitch head (Figure 1). Ensure that the coupler handle is completely in the locked position before reinserting the safety pin into the handle. Before towing, connect the electrical cable and breakaway. Close and latch tailgate.
Pull Test
Slightly raise the landing gear of the trailer. Do not stand between the trailer and the truck bed. Release the emergency brakes on the truck and apply the trailer brakes. Slowly try to pull the trailer forward. The wheel chocks and trailer brakes should not allow the truck to move forward if the hitch is properly connected. The trailer will separate from the truck if it is not properly connected. If the trailer separates from the truck the landing gear will prevent the trailer from dropping or falling on the sides of the truck bed. Completely raise trailer jacks. Check for proper clearance between truck box and trailer as stated on page 7, Step 2b. Remove and store wheel chocks.
Unhooking the Trailer
Lower the landing gear on the trailer to rest firmly on the ground so that load is level with truck suspension. Chock the wheels of the trailer. Lower truck tailgate. Remove the pin from the coupler handle. Pull and rotate handle to the open position. Raise the trailer until the tongue weight is removed from the truck and the king pin is above the hitch head. Disconnect electrical and breakaway. Move the truck forward from underneath trailer. Rotate handle back to the locked position and reinsert the safety pin to lock the handle in closed position.
Uninstalling the Hitch
First remove the hitch head by loosening the driver side and tailgate side jam nuts and bolts. Then remove the 3/4” x 4-1/4” pin. Pull hitch head/center post out of base and set aside. To remove base, loosen cab side jam nut and bolt. Then loosen top bolt on hitch base. Finally remove the two (2) 1/2” x 3-3/8” pins from hitch base and lift to remove base from gooseneck ball.
Additional 5th Wheel Hitch Accessories
Blue Ox has a variety of hitch accessory kits available for use with the BXR2100 Fifth Wheel Hitch including: