The TrackPro™ is an innovative weight distribution hitch that manages not just weight distribution but also sway prevention by combining loaded spring bars, friction L brackets, and an integrated hitch head. As the trailer sways, a higher load is placed on one side of the bars; as this occurs, the spring bars pivot on the hitch head and balance the weight, working with the friction L brackets to prevent and limit trailer sway. At the same time, the TrackPro™ works as an excellent weight distribution hitch, putting more weight on the towing vehicle’s front tires, increasing steering control and braking, and providing a safer and smoother driving experience. Here’s how to install this weight distribution hitch.
How to Install the TrackPro™ Weight Distribution Hitch
Step 1
Be sure to begin by parking your vehicle and trailer on firm, level ground in a straight line. If your vehicle has an automatic leveling system or Air-ride suspension, you will want to refer to your vehicle’s owner manual to be sure you are using the proper set up before beginning to install the weight distribution hitch. Once you have done this, unhook the trailer from the towed vehicle and remove the existing receiver hitch.
Step 2
Insert the hitch mount receiver shank into the towing vehicle receiver and secure it with the 5/8” x 3” pin and clip.
Step 3
Level your trailer and measure the coupler height. Next, install the hitch head onto the receiver shank with 3/4”-10 bolts, 3/4” lock washers and 3/4”-10 hex nuts. Then, measure the hitch head ball height. The ball height should be the same height or 1” higher than the trailer coupler height. Adjust as needed, then torque the 3/4”-10 bolts to 250 ft/lbs.
Note: If you are installing TrackPro™ on a Dodge Ram truck, you will need to reference the Trailer Towing portion of your vehicle’s owner manual to determine the proper hitch set-up instructions. For optimal towing, it is recommended to set the ball height 2” higher than the top of the trailer coupler.
Note: For vehicles manufactured with integrated sway control, please reference the Trailer Towing section of your vehicle owner’s manual to learn how to properly disable this system.
Step 4
Couple the trailer to the hitch head by placing the trailer coupler onto the hitch ball per the manufacturer’s instructions.
Step 5
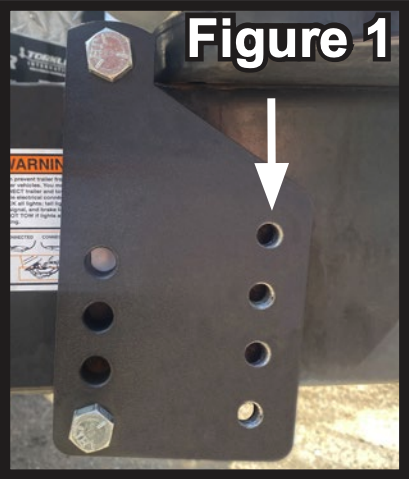
From the center of the ball coupler, measure 20”-25” inches back and mark this point on both sides of the trailer tongue frame. You will then center the L bracket mounting holes on the backing plate over this mark. Be sure the offset is towards the front of the trailer on each side. Both backing plates need to be equal in distance from the ball coupler. If necessary, remove or relocate any obstructions on the trailer tongue framework. Use your fingers to tighten the bolts on the backing plates (you will tighten them more later). The bottom bolt should be inserted in the hole closest to the bottom of the trailer frame. (see Fig. 1)
Note: If your trailer has a bottom-mount coupler, you may need to purchase longer L brackets. You can purchase this from Blule Ox using part number BXW4069.
Step 6
Next, you will insert the spring bars into the pivoting trunnion. Be sure that the lines indicating the spring bar size are facing up. Insert the locking pins from the inside of the bar toward the outside.
Step 7
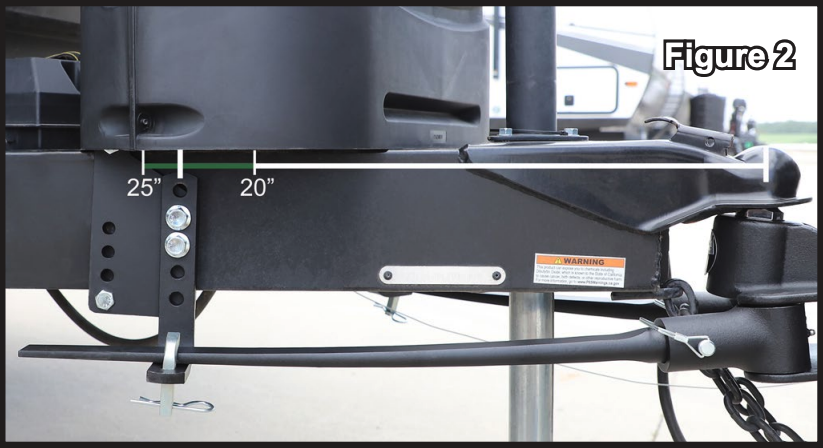
Check that the end of the spring bar is a minimum of 4” from the center of the L bracket backing plate to the open end of the bar. Verify that the L brackets are 20”-25” from the center of the coupler and fully tighten the 1/2” hex head bolts against the trailer tongue framework. (See Fig. 2)
Step 8
Install the L brackets on the backing plate by inserting the two 1/2” whiz flange bolts leaving the top hole open on the L bracket. Apply Blue Loctite to the threads and torque bolts 78 ft/lbs. (See Fig. 2)
How to Operate the TrackPro™ Weight Distribution Hitch
Once you have successfully installed the TrackPro™ Weight Distribution Hitch, you can prepare to hit the road. Follow the operating instructions below.
Step 1
Be sure the vehicle and trailer are both parked on firm, level ground in a straight line.
Step 2
Install the hitch head/receiver mount assembly into the towing vehicle receiver tube and secure it with the 5/8” x 3” pin and clip.
Step 3
Couple the hitch head to the trailer.
Step 4
Per installation instructions, install both spring bars into the pivot tubes and install locking pins.
Step 5
Confirm that both L brackets are secure against the trailer frame.
Note: Before each tow, you should always confirm that all brackets are tightened to specified torque specs.
Step 6
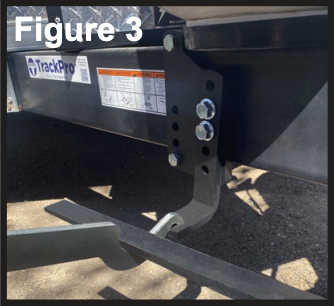
Use a trailer jack to support the trailer tongue weight for easier hookup. Place spring bars into the dip on the lift tool and then place the hook end into the square hole in the L bracket. Raise the lift tool upward until the spring bar snaps securely into place. Place the bar locking pin into a square hole on the L bracket and secure it with a hair pin. Do this on both sides of the trailer. (See Fig. 3)
Note: It is normal to see some wear on the L bracket where the spring bar sits during towing, as this is a natural wear point.
How to Unhook the TrackPro™ Weight Distribution Hitch
When you’ve reached your destination and are ready to unhook your trailer, follow these steps.
Step 1
As always, park your tow vehicle and trailer on firm, level ground in a straight line.
Step 2
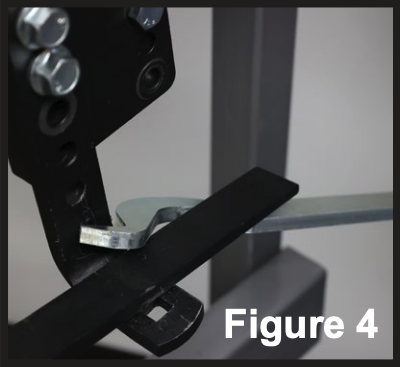
Use a trailer jack to support the trailer tongue weight to ease the tension on the spring bars and allow for easier unhooking. Remove the locking pin from the L bracket. Ensure that you are not in the path of the spring bar as it is removed, standing rearward or behind the end of the spring bar. Hold the tool horizontally with the hook inward and slide under the spring bar in a forward motion. The hook of the tool will press against the L bracket. Hold the tool firmly and pull outward with the tool. This will remove the spring bar from the L bracket. Do this on both sides of the trailer. (See Fig 4)
CAUTION: Always use caution when unhooking TrackPro™. There is potential for injury due to the high amount of tension on the spring bars. Be sure to hold the tool firmly as you release the spring bar from the L bracket. In a slow and steady manner, apply outward pressure to the lift tool. Do not stand in the path of the spring bar.
Step 3
Disconnect the spring bars from the hitch head by removing the locking pins from each side. Remove spring bars from pivot tubes.
Step 4
Unhook the trailer coupler from the hitch head.
Step 5
Remove the hitch pin and clip from the hitch receiver.
Step 6
Remove the hitch head/receiver mount assembly from the receiver tube.
* For the complete instructions for how to install this weight distribution hitch as well as additional information, including warnings and troubleshooting tips for the TrackPro™, click here.