Blue Ox has a variety of high-quality tow bars to meet your towing needs, with towing capacity ranging from 6,500 to 15,000 pounds to accommodate most flat tow vehicles. Our three most popular tow bars are:
- Apollo™ – All steel construction with a 15,000 lb towing capacity. Available in 2” and 2.5” receivers. Excellent for 1-ton pickups and larger SUVs.
- Ascent™ – Aluminum construction with a 7,500 lb towing capacity. Available in 2” and 2.5” receivers. Perfect for smaller cars and SUVs.
- Avail™ – All steel construction with a 10,000 lb towing capacity. Available in 2” and 2.5” receivers. Rated for larger cars, ½ ton pickups, and SUVs.
See the entire Blue Ox selection of tow bars online and keep reading for basic towbar installation instructions.
Towbar Installation Instructions
Safety First: Before beginning towbar installation, ensure that your towing vehicle is the proper size to control your towed vehicle. Check your vehicle manufacturer’s recommendations for towing, hitch load, and braking capacities. Additionally, the hitch, ball, motorhome chassis, and safety cables must be rated at a minimum for the weight of the vehicle being towed.
Install the Towbar
Insert the hitch connector into the receiver tube of your towing vehicle’s hitch. Check that the tow bar is right side up with the locking handles on top. Insert the receiver pin into one of the two holes on the hitch receiver (most commonly the inside hole).
Note: Your towing vehicle’s rear configuration will determine how far you can insert the hitch connector into the receiver tube. Later on, when you fold the tow bar, you may need to change which set of holes is used in the hitch connector or order a longer hitch connector.
Caution: 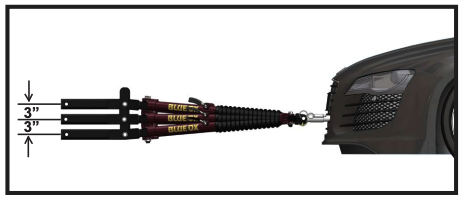 It is essential that the attachment points at the center of the attachment tabs and the center of the coach’s hitch receiver are of equal distance. If a deviation must occur, then it is recommended that the hitch receiver be no more than 3” above or below the attachment tabs of the baseplate.
Note: In certain situations, additional length from the tow bar receiver to the towing vehicle’s hitch may be necessary for sufficient clearances. Please see the installation instructions specific to your model tow bar if you have clearance issues to ensure you are not misusing your tow bar or voiding any warranties.
Hook Up the Towed Vehicle
Step 1
Park your towing vehicle on a level surface with a straight driveway ahead. Engage the parking brake. Position the towed vehicle in the approximate towing position behind the towing vehicle.
Step 2
Partially extend one leg. The legs are held in with an internal “soft” latch. Pulling out on the leg will disengage this latch. Place the triple lug between the attachment tabs on the baseplate, and secure with the 1/2” pin and quick pin. Be sure the 1/2” pin is installed correctly. Repeat for both legs.
Step 3
Disengage the parking brake of the towed vehicle, set up the transmission for towing, and unlock the steering wheel. Pull the towing vehicle forward until one or both of the locking handles are engaged and locked. You will know they are locked when they “pop” up. If you find only one locking handle is locked, turn the towed vehicle’s steering wheel about a ½ or ¾ turn in the direction of the unlocked tow bar leg. Drive the towing vehicle forward until the second leg is locked into place.
IMPORTANT: 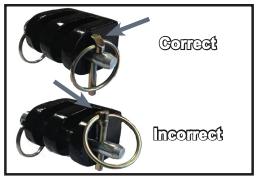 Check to ensure both legs are latched properly, and pins are secured properly before towing. When properly installed, the quick pin ring will snap back onto itself, and the chamfered side will be facing outwards. The steering wheel on the towed vehicle must be unlocked at all times while being driving conditions.
Install Safety Cables
Step 1
Using the hooks, secure the cables to a solid part of the towed vehicle’s chassis or the convenience links of the baseplate in a crossing pattern. Ensure that the safety snap clicks back against the hook to prevent disconnection.
Step 2
If needed, adjust the slack to allow enough room for turning. The cables should not make contact with the ground, pintle coupler, or locking handles. This can damage them. DO NOT USE DAMAGED SAFETY CABLES. Route the cables away from the locking handles. Safety cable’s contact with a locking handle could cause the leg to become unlatched and collapse, causing major damage to one or both vehicles as well as the towing equipment. DO NOT WRAP SAFETY CABLES AROUND THE LEGS!
Step 3
Verify that the load capacity of cables or chains used meets the needs of the towing setup.
How to Unhook from Towed Vehicle
Step 1
Park the towing vehicle and vehicle in tow on a level surface in a straight line to be sure minimum pressure is exerted on the legs of the tow bar and aid in removing the ½” pins. Set the towing vehicle’s parking brake. Put the towed vehicle in park if an automatic transmission or securely in first gear if a manual transmission, and engage the parking brake. Disconnect the lighting cables and safety cables.
Step 2
Push down on the locking handles to disengage the leg latches. Remove the quick pins and ½” pins that attach the triple lugs to the attachment tabs. If there is still pressure on them, you may need to tap the ½” pins. Compress both legs completely until they are locked into place. Put the ½” pins back into the triple lugs and secure them with the quick pins to avoid losing either of them.
Note: Each leg has a magnetic latch inside. You can slide each leg inward until it is held in place by this magnetic latch.
Storing Your Towbar
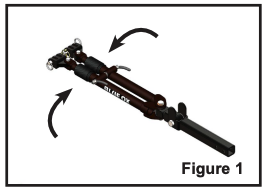
Step 1
Swing both legs inward towards each other. (Fig.1)
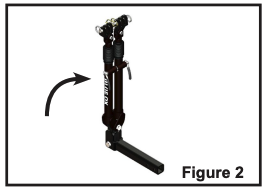
Step 2
Once both legs are together, swing them up towards the towing vehicle. (Fig. 2)
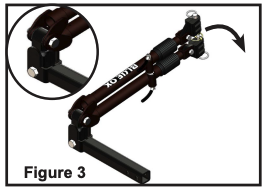
Step 3
Rotate the legs down to either side until the ears of the leg capture the hold-up tab of the hitch connector. (Fig. 3)
For the full owner’s manual, including towbar installation instructions, for your specific Blue Ox tow bar, please refer to the following:
- BX4330 Acclaim Tow Bar (Ball Coupler)
- BX4370 Ascent Tow Bar (2″ Receiver)
- BX4375 Ascent Tow Bar (2.5″ Receiver)
- BX7322 Adventurer Tow Bar (Ball Coupler)
- BX7380 Alpha 2 Tow Bar (2″ Receiver)
- BX7420 Avail Tow Bar (2″ Receiver)
- BX7425 Avail Tow Bar (2.5″ Receiver)
- BX7460P Allure Tow Bar (Pintle)
- BX7470 Apollo Tow Bar (2.5″ Receiver)
- BX7520P Trion 20K Tow Bar (Pintle)
Browse All Blue Ox Flat Towing Equipment
Along with the wide selection of towbars, Blue Ox has custom baseplates and a variety of other flat towing accessories, like deflectors, to get you to your destination safely. Visit the website to learn more or to place an order.